Using the TUI
The sec-gemini package includes a built-in terminal user interface. It provides a keyboard-centric interface for authenticating, creating and resuming sessions, chatting with the agent, and monitoring tool execution – all without leaving your terminal.
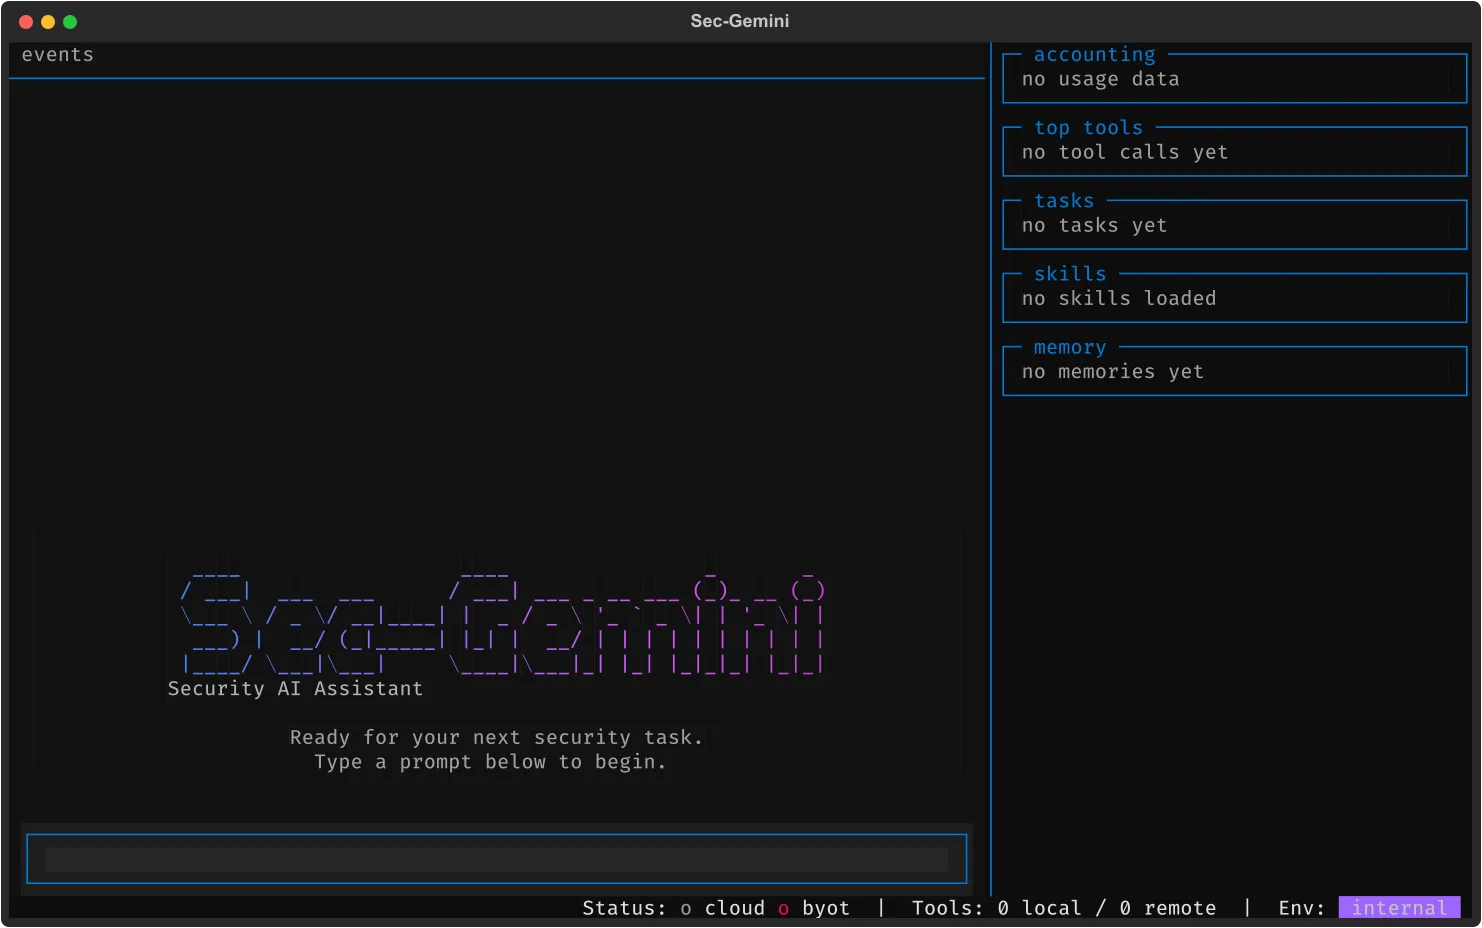
The TUI is organized into three screens: Auth, Session List, and Session. You navigate forward by selecting or creating a session, and back with Escape.
Installation
Section titled “Installation”Install the package from PyPI to get the TUI, CLI, SDK, and BYOT client:
pip install sec-geminiSetting Your API Key
Section titled “Setting Your API Key”Get an API key from secgemini.google/keys. You can set it from the command line:
sec-gemini set-keyOr launch the TUI directly – it will prompt for your API key on first run:
sec-geminiBoth verify the key and save it to ~/.config/sec-gemini/config.toml for future sessions.
Launching
Section titled “Launching”Launch the TUI after installation:
sec-geminiOr run it directly without a global install:
uv run sec-gemini| Option | Description |
|---|---|
-v, --verbose |
Enable verbose debug logging to stderr |
--disable-logging |
Disable session-level logging for privacy |
--model MODEL |
Run every agent role on MODEL (e.g. gemini-3.8-flash-cyber); pre-selects the Model dropdown |
See the TUI CLI Reference for the full command and option list.
Auth Screen
Section titled “Auth Screen”Shown on first launch or when a saved API key is missing or invalid. Enter your API key in the password-masked input field and press Connect. If the key is invalid, an error message appears inline.
Once authenticated, the key is saved to ~/.config/sec-gemini/config.toml and the TUI skips this screen on subsequent launches.
You can also set your key from the command line without launching the TUI:
sec-gemini set-keySession List Screen
Section titled “Session List Screen”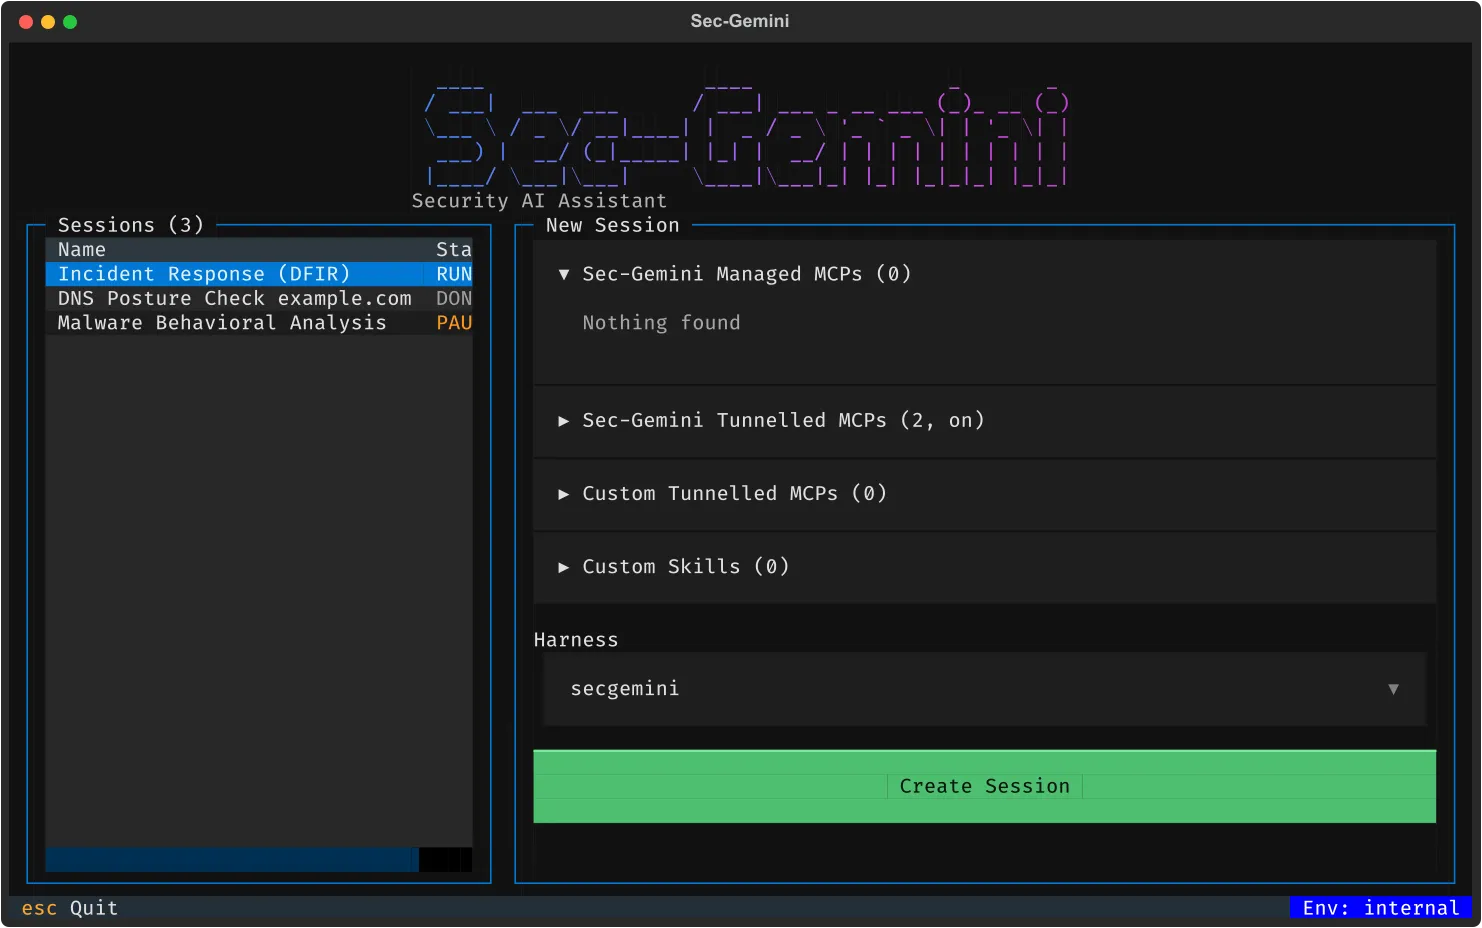
After authentication you land on the Session List screen. It has two columns:
Left column – Session table
Section titled “Left column – Session table”A table of your existing sessions showing Name and Status. Click a session or highlight it and press Enter to resume it.
Right column – New session configuration
Section titled “Right column – New session configuration”Collapsible sections for configuring a new session before creation:
- MCP Servers – Multi-select list of available MCP servers. Some are pre-selected based on server defaults.
- Local Tools – A global on/off toggle for baseline tools (file operations, shell, Python, JavaScript, network), plus per-tool checkboxes. When baseline tools are enabled, overlapping cloud MCP servers (e.g. network tools) are automatically disabled to avoid conflicts.
- Skills – Expandable list of available skills (collapsed by default).
- Model – Dropdown that picks the Gemini model for every agent role: Default (the deployment’s standard model),
gemini-3.8-flash-cyber(listed on internal and dev deployments only, where the project is allowlisted), or the model passed via--model. The choice is sent as theconfig.modelsession override and persists for the whole session;--fast-model/--escalation-modeloverride it per role.
Press the Create Session button at the bottom to start a new session with the selected configuration.
Session Screen
Section titled “Session Screen”The main chat interface where you interact with the agent. It has five areas:
Event bar
Section titled “Event bar”A compact ticker at the top showing recent agent events. Each event displays a short type tag (RSP, TOOL->, TOOL<-, PROG, ERR, WARN, DONE, etc.) with a timestamp and summary.
Chat view
Section titled “Chat view”The central scrollable area displaying the full conversation: your prompts, agent responses (with markdown rendering), collapsible thought blocks, and tool call/result pairs. When you resume an existing session, previous messages are loaded automatically.
Right panel
Section titled “Right panel”A 40-character wide sidebar toggled with Ctrl+L. It contains independently scrollable sections:
- Top Tools – Horizontal bar chart of tool invocation counts. Local tool calls are shown in purple, remote in blue.
- Tasks – Hierarchical task tree with state indicators (new, executing, done).
- Skills – Loaded skills with their descriptions and origin.
- Memory – Categorized memory entries from the agent.
- Files – Uploaded session files. Only appears when files have been uploaded.
Prompt input
Section titled “Prompt input”A multi-line text area at the bottom (grows from 3 to 8 lines as needed). Press Enter to send your message, Shift+Enter to insert a newline. An Upload button (Ctrl+U) and Send button are displayed alongside.
Status footer
Section titled “Status footer”A single-line bar at the very bottom showing:
- Session name (left side)
- Status indicators – color-coded dots for cloud status (green = running, yellow = pending, blue = completed, red = failed) and BYOT connection status
- Tool counts – local and remote tool call totals
- Skill count – number of loaded skills
- Elapsed time – formatted as hours, minutes, seconds
- View Logs – clickable link to the server-side log viewer
Keybindings
Section titled “Keybindings”Session List Screen
Section titled “Session List Screen”| Key | Action |
|---|---|
Enter |
Create a new session |
Escape |
Quit |
? |
Show help |
Session Screen
Section titled “Session Screen”| Key | Action |
|---|---|
Escape |
Go back to session list |
Ctrl+S |
Save full session trajectory |
Ctrl+C |
Copy focused content |
Ctrl+V |
Paste from clipboard |
Ctrl+P |
Pause / Resume session |
Ctrl+L |
Toggle right panel |
Ctrl+U |
Upload file |
? |
Show help |
Prompt Input
Section titled “Prompt Input”| Key | Action |
|---|---|
Enter |
Send message |
Shift+Enter |
Insert newline |
File Upload
Section titled “File Upload”Press Ctrl+U or click the Upload button to open the upload dialog. It shows a file browser and a path input field. Select a file and confirm to upload it to the current session. Uploaded files appear in the Files section of the right panel.
Saving Output
Section titled “Saving Output”Press Ctrl+S to save the full session trajectory as a markdown file. A dialog lets you choose the output path. The saved file includes all messages with timestamps.
BYOT Integration
Section titled “BYOT Integration”Local tools are configured on the Session List screen before creating a session. When you enable baseline tools or add custom MCP servers, the TUI starts the BYOT client in the background and connects them to your session. See the Bring Your Own Tools (BYOT) guide for full details.
You can monitor BYOT status in the status footer (green dot = connected, red = disconnected). The right panel’s Top Tools bar chart distinguishes local tool calls (purple) from remote ones (blue), so you can see which tools are running on your machine vs. in the cloud.
When baseline tools are enabled, the TUI automatically disables overlapping cloud MCP servers to avoid duplicate tool definitions.
Configuration
Section titled “Configuration”See the Configuration Reference for the full config.toml format, environment variables, and log file locations.